Showing posts with label gun gear. Show all posts

Sep 28, 2010

Gun Gear: Crossbreed SuperTuck Deluxe


Make: Crossbreed Holsters
Model: SuperTuck Deluxe, Cowhide with Combat Cut option

This is the second holster I've evaluated for my p229 Holster Hunt.

I'd read some very good things about the Crossbreed kydex/leather hybrid holsters, but also quite a few negatives.  But the basic premise seemed sound: use a large piece of flexible leather against your body to distribute weight and then use kydex to hold the gun in place (and reduce the price).

I got this holster on eBay, and $68 with 3-day delivery sounded a lot better than $86 with a 4-week delivery if I were to order directly from Crossbreed.  Seemed like a great deal.  But as soon as I pulled it out of the package, I realized I'd been a little too quick on the bid button.  The holster was actually meant for a p229R (with rail), and of course, mine is the non-railed version.

Being that the holster is Kydex, it is form fitted to the shape of the frame, and the p229 and p229R are just different enough to where my p229 wiggles around too much when holstered.  So that was a bummer, but then I realized that my p226R should theoretically fit pretty well, and indeed it did. 

I was tempted to just put the holster back up for sale on eBay and order the correct p229 version from Crossbreed, but then I figured since I already had it in hand, why not just evaluate it using the bigger p226R?  If it was comfortable with the full-size pistol and concealed decently, things could only get better when I switched down to the smaller p229.  In fact, I thought that maybe I would just keep this one even if I do end up ordering the p229 version.  While I don't really have any plans to carry the big p226R concealed, it wouldn't hurt to have a holster for it just in case (like maybe when the p229 is at the gunsmith's for example).


Impressions
So Crossbreed markets these by saying that everything (including style) is absolutely secondary to Comfort.  I have to say, I think they've nailed it.

At the time of this writing, I've only spent a few days wearing it, but after awhile, you don't notice it anymore than you would a little knife pouch on your belt.  That big piece of leather really does the work of distributing the weight of the gun, as well as making sure that nothing is pressing into your body in any one particular spot.  And again, this is with the full-sized p226R.


A Note on Retention
So my range holster of choice is typically a Kydex rig.  As such, I'm used to the pistol having that nice friction lock when it's fully seated in the holster.

But even though the p226R fits into the Crossbreed Kydex perfectly, there is absolutely zero retention.  If you turn the holster upside down, the gun will fall out before you even get it straight up and down.  The interwebs have more than a few reports of similar cases.  It seems like it's hit or miss; sometimes it retains well, sometimes it doesn't.  Crossbreed apparently supplies directions on how to shrink the Kydex for a better fit, but many people say that shouldn't be something the owner should be forced to do, and I agree. 

However, note that this problem only exists when the holster is not rigged on your belt.  Once it is properly secured, the belt holds everything in place very well.  With the gun holstered inside my waistband, I basically did every shimmy, shake, jump, spin, and twirl I could muster, trying to get it to come loose or pop out, and it never even budged.

So would I prefer it if the gun did lock?  Absolutely.  Does it really effect the performance of the holster in daily, practical applications?  So far, I don't think it does.  You'd probably have to get hit by a bus to knock the thing loose, and at that point, you've got much bigger problems than a stray pistol.

If I do eventually order the right version from Crossbreed for my p229, though, I'm hoping I'll get one that has good retention.


The Gist
So far, I can't really find fault with this holster.  It's very, very comfortable.  Build quality seems excellent.  Price is even pretty decent.  Could I have found my ultimate concealment holster on just my second try?  Time will tell, but so far, so good...


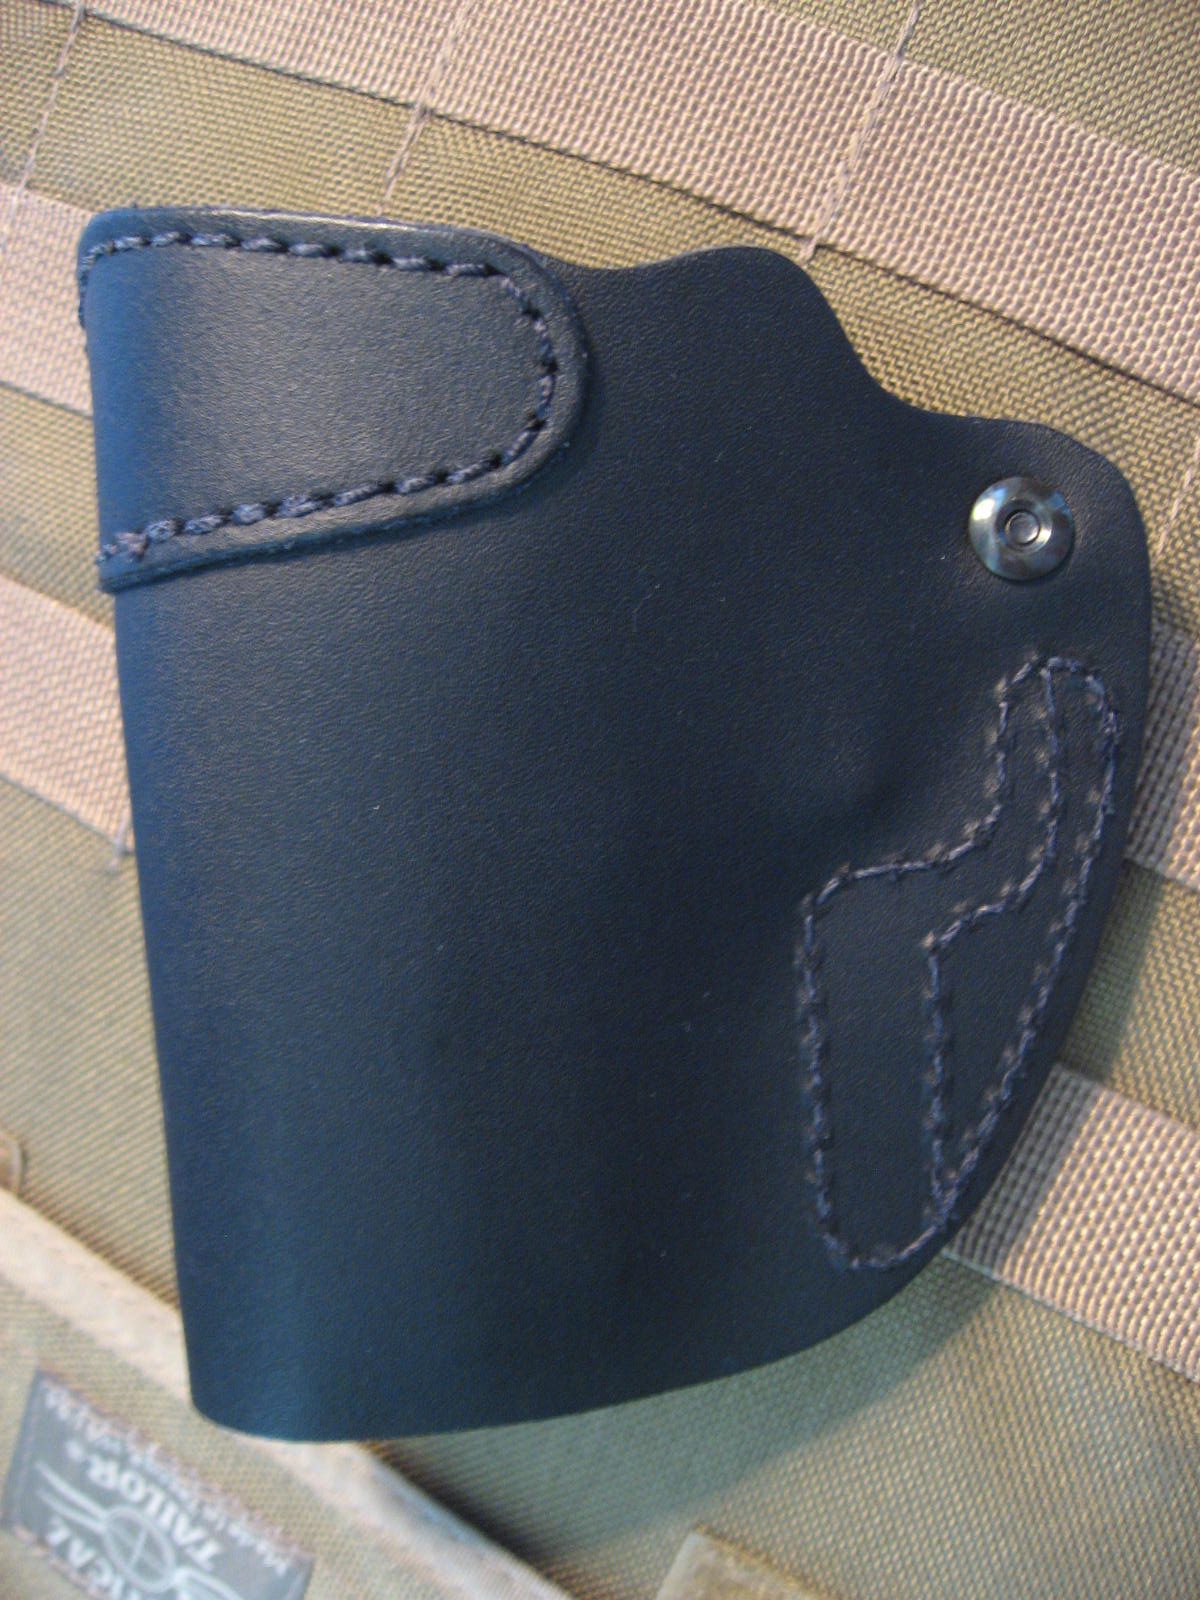
This is a very sturdy metal belt clip.  You can also tuck a shirt in behind it.


The back is rough leather which keeps it solidly in place when drawing and reholstering.  "Rough" is too strong a term, though.  It's definitely not sandpaper rough.  Anyone who thinks this is rough on their skin needs to grow some chest hair.

Note that all the metal points you see here are so far recessed into the leather that you'd never feel them on your skin, either.


Detail of the rivets on the holster.


You get no fewer than three Celtic crosses (one here, and one on each belt clip).  I think they could have skipped the ones on the belt clip since you want those to be as innocuous to casual glances as possible.

Gun Gear: High Noon Bare Asset


Make: High Noon Holsters
Model: Bare Asset

This was the first holster I evaluated in my p229 Holster Hunt.

I found this holster in a gun forum classifieds section.  High Noon seemed to have a decent reputation on the interwebs, and for just $20 it seemed like a worthwhile gamble. 

High Noon makes higher end leather holsters with longer turn-around times, but the Bare Asset is one of their "stocking items" and costs about a fifth of the price.  Given that, I wasn't expecting too much, but I was pleasantly surprised when I got my hands on it.

This is a very soft, very thin holster, but feels well made.  There's a good metal belt clip that does exactly what it's supposed to do.  What really surprised me was that even though there's no metal strip to stiffen the mouth of the holster like you'd see on higher end models, there's a thicker strip of leather there that keeps it open just wide enough to let me re-holster one-handed very effectively.

I really wanted to like this one, mainly because if it did the job right, I'd only be out $20 and I would have nailed the perfect holster on my first try.  But on the first day of wearing it, I realized it wasn't going to be that easy.  I wore it at the 4 o'clock position and within a few hours, I noticed that my lower back was actually aching.  It was odd since it wasn't a jabbing pain like the gun and holster were poking me in the side.  It was more like a general muscle ache you'd get from repetitive strain.  Hard to say exactly what the cause was, but there was no getting around the fact that it just plain hurt.  I wanted to try to wear it eight straight hours, but eventually I just had to give up.

I actually don't think this was due to any intrinsic fault of the holster itself.  It's well made, and does what it says it'll do.  I think this is just back to the problem of every holster fitting differently on every body.

I do like the overall fit and finish of the product, though.  I'll have to revisit High Noon when it comes time to get a holster for the pocket revolver.


Gun Gear: Looking for Concealment


So I'm officially on the hunt for a good concealment holster.  The good news is there's a lot to choose from.  The bad news is there's a lot to choose from.

And unfortunately, since every holster will feel different to a person based on body type and personal preference, reading other people's opinions only counts for so much.  Then what's the point of blogging about it, you ask?  I figured I'd just try to record the evaluation process as opposed to recommending a specific product. 

My first goal is to find a good concealment holster for my SIG p229, which I would like to make my EDC gun.  It's not the smallest or lightest pistol in its class, but I think carrying around a few extra ounces is worth it if, god-forbid, you ever have to actually use it and all the SIG quality and dependability comes into play.  Plus I've been shooting it for more than five years now, so it's hard to make the argument to switch to a different platform without a very good reason.

But I could still see the need to be able to carry something a lot smaller and lighter in certain situations, like when all you've got on are gym shorts and a tank top and can barely conceal a wallet, let alone a handgun.  I'm thinking a Smith & Wesson scandium revolver...  But a holster can wait until after I actually buy it.

So first up is something for the p229...

My criteria for the holster:
1) Comfort, comfort, comfort!
2) How well it conceals
3) How well you can re-holster one-handed
4) Retention of the firearm
5) Quality (essentially how well it will hold up over time)


The Holster Hunt so far...
1.  High Noon Bare Asset (jump to post) - No Go on Comfort...
2.  Crossbreed SuperTuck Deluxe (jump to post) - So Far So Good!

Apr 11, 2010

MOLLE Gear: Pouch Round-Up

If you're in the market for a simple MOLLE magazine pouch, it's hard to go wrong with any of the major US brands. At that point, you'll probably choose the pouch based on price or your preferred MOLLE attachment system.

But there are plenty of variations on that basic theme, whether it be pouches with extra retention capabilities, shorty or staggered stack versions, pouches that combine rifle and pistol pouches into one, etc. I'd wanted to do some side-by-side comparisons of these kinds of pouches, and as I wrote up a table of which company offered which pouch, I realized that maybe the table itself would be a valuable post.


Basic M4/M16/AR-15 rifle pouches
* Standard Pocket: This refers to the most basic type of pouch that is essentially open on one end, closed on the other, and has some kind of bungee restraint to hold the mag in place.  In pocket pouches, one end of the mag will always be exposed.

* Flap: This is essentially a pocket pouch but with the addition of a flap that folds over the top of the mag and typically secures by either hook and loop or Fastex buckle.

Other/Specialty rifle pouches
* Retention: This refers to pouches that use some type of system to exert extra force on the magazine to hold it in place.

* Combo = Pistol/Rifle Combined: This refers to pouches that integrate a rifle and pistol mag pouch into the same unit.

* Shorty = Short Pocket: This is a pocket pouch made deliberately shorter than normal so that more of the magazine body is exposed at the top.


M4/M16/AR-15 MOLLE Mag Pouch
Standard Pocket Flap Pocket Other/Specialty
Tactical Tailor Yes Yes No
Eagle Industries No Yes Retention
Paraclete No YesCombo
Spectre Gear Yes Yes No
HSGI Yes Yes No
S.O.TechYes Yes No
TAGYes Yes Combo
Blackwawk* Yes Yes No
Maxpedition* Yes Yes Shorty

* Manufactured offshore


9mm Pistol pouches
* Standard Flap: This refers to the standard type of pouch that has a fold-over flap, usually secured by hook and loop, which holds the magazine in place.  Note that these pouches will also hold flashlights, multi-tools and folding knives, and are sometimes even sold under the "sheath" or "knife" category.

* Added retention: This refers to pouches that use some type of system to exert extra force on the magazine to hold it in place.

Pistol MOLLE Mag Pouch
Standard Flap Added Retention
Tactical Tailor Yes Yes (Magna)
Eagle Industries Yes Yes (FB)
ParacleteYes No
Spectre Gear No No
HSGIYes No
S.O.TechYes No
TAGNo Yes
Blackwawk*Yes Yes (Talonflex)
Maxpedition*No** No

* Manufactured offshore
** While Maxpedition does make a standard pistol/knife flap pouch, it is not designed to be MOLLE compatible.


Made Where?
It may be worth noting that both Blackhawk and Maxpedition use offshore facilities to produce some of their gear, though I include them here simply for the sake of comparison.  All the other companies listed handle both design and production in the US.

Tactical Tailor: Washington State
Eagle Industries: Missouri
Paraclete: North Carolina
Spectre Gear: California
HSGI: North Carolina
S.O.Tech: California
Tactical Assault Gear (TAG): California

Apr 9, 2010

Gun Gear: Magpul B.A.D Lever


Make: Magpul
Model: B.A.D Lever (Battery Assist Device)

I had been eager to try Magpul's BAD Lever as it provides for ambidextrous release of the bolt catch and the ability to use two hands is always better than just one (which reminds me, I really need to install an ambi safety.)

Installation takes less than five minutes.  There's the lever itself along with a back piece that fits around the ping-pong paddle of the stock bolt catch.  You screw them in place (the screw comes with Loctite already on the threads) and you're done.

Mechanically speaking, it works perfectly, and you'd expect nothing less from Magpul.  It's a simple finger press downward and to the left to release the bolt, or you can manipulate it upward and to the right to lock the bolt in place.

Theory vs practice
So in theory it absolutely works as advertised.  In practice, however, you could classify working this small lever with one finger as a very fine motor skill.  It's simple and effective, but it's still a single finger pushing a small lever.  Compare this to slapping the ping-pong paddle with your left palm, which is a rather gross motor skill and almost hard to get wrong.

I compare it to manipulating the slide release on a pistol versus racking the entire slide with your weak hand.  If you were taught to rack the slide with your weak hand so that you're not relying on finding and manipulating a small lever in a high stress moment, then you may also be the kind of person who would not want to rely on the BAD Lever under fire.

Options, options, options
But it's important to point out that installing the BAD Lever does not inhibit the functionality of the ping-pong paddle in any way.  You can still continue to use your left hand to manipulate the bolt catch if you so desire, and that to me is what makes the BAD Lever a good addition to the rifle: it simply gives you more options.  If you're in a situation where it's better to use your right finger to work the BAD, it's there.  If you're in a situation where you need to slap the ping-pong paddle instead, that option is still there, too.

Practice makes perfect
While operating the BAD Lever is push-button easy, it almost goes without saying that you should still take time to train with it and not confuse ease-of-use with efficiency-of-use.  For example, on one of my first range trips with the BAD Lever installed, I discovered that I had a tendency to rest my finger too close the lever whenever I'd take it off the trigger to reload.  During one mag change, I accidentally put too much pressure on the lever, and dropped the bolt closed before I'd put in my fresh mag. 

But since then I've spent considerable range time with it, and it's graduated from being simply a nifty add-on feature to becoming a truly integral part of the rifle.

MOLLE Gear: Tactical Tailor MAV Vest and Bib


Make: Tactical Tailor
Models:
MAV Vest (tan)
MAV Bib (tan)
5.56 Single Mag pouch (coyote)
Knife/mag pouch (tan)
90 degree panel (coyote)

Make: ITW Military Products
Model: FASTmag 5.56 Single Mag Carrier, Gen 3


I'm fortunate enough to shoot at a range that lets me draw from the holster, wear a vest, shoot rapid fire rifle, and generally do odd training exercises that may otherwise be frowned upon.

I set up this vest to be simple and straightforward, and it lets me practice reloading drills when shooting the AR-15.  Note that this is the MAV Vest and Bib together (they are sold separately).  As you can see, I keep four 5.56 mags front and center, and there are two 9mm SIG pistol mags on the left.  These are mounted on the MAV Vest.  Additionally, there is a 90 degree panel mounted on the Bib, though I'm not currently using it for anything.

I'm fond of Tactical Tailor products and quality is typically good.  I really have no complaints about the MAV Vest and Bib, though I admit they don't see very hard use.

 
Standard pouch vs FASTmag
I actually steered away from the FASTmag carriers at first.  I'm a bit of a traditionalist as well as a strong believer in the KISS principle, so a simple MOLLE pouch with a bungee retaining strap seemed like the right way to go.  AR-15 mags sit fairly deep in these pouches.  I find that the fastest method to get them out is to pull off the strap and then actually yank the mag out of the pouch with my thumb and forefinger just far enough to switch to a full "coke can" grip on the main body.  From there I pull it free entirely and proceed with my reload.  It sounds like an annoying extra step, but with practice it becomes a quick, single motion.  Do note that some manufacturers sell "short" versions of this type of pouch that leaves a much larger portion of the magazine exposed which would make this extra yank unnecessary.

But the FASTmag carrier makes this entirely moot.  I'm definitely a convert.  While technically speaking, you need to "twist" the mag a bit to free it from the carrier, after you do it a dozen times you really just end up feeling like you're pulling the mag free without any additional wasted motion or effort.  And rest assured, the mag locks in place pretty securely.  I think you'd have to be dragged on a horse before you'd need to worry about mags popping free.

Built-in storage
Both the Bib and the main Vest have a small utility pouch built-in, which is quite handy for storing smaller items.


Secondary ammo
The standard pistol mag pouches are of typical design and can also hold lights, multi-tools, or folding knives. 

 
90 degree panel
This panel will turn a pouch 90 degrees from how it would otherwise be mounted.  I could think of a lot of pouches that could potentially go there, but there was nothing else I really needed on this vest so I just left it open for now.

 
A nice touch
For whatever reason, the MOLLE loops on the outermost edge of the MAV bib are a little bigger than the rest.  Just big enough to hold a Leatherman Skeletool in place.

Bullet Button tool
For you Californians, this is how I work my Bullet Button.  I whittled down a wooden chopstick to the right length and slightly rounded off the ends.  I attached it to the end of a Key-Bak key keeper which mounts nicely to the vest.  I use a Grimloc just to help ensure the chopstick returns to the same position each time.

To reload, I just use the chopstick to activate the Bullet Button.  As soon as I let it go, the Key-Bak yanks it bank into place with no fuss.

It works well, and reloads are pretty quick and effective.  I'm sold on using the Key-Bak though I think I could eventually come up with something better than the chopstick.


Apr 7, 2010

Gun Gear: EOTech 511.A65/1 and GG&G Lens Covers


Make: EOTech
Model: EOTech 511.A65/1 holographic weapon sight

As usual, I won't even attempt to do an in-depth review of the EOTech given that the interweb is full of more expert opinions than mine.  I will simply share my own impressions...

This is the "shorty" model of the basic EOTech sight which uses two N-sized 1.5V batteries.

I actually bought the AA model first, but with the way I had to position it on the top rail, the front of the sight would hang out past the receiver and extend over the barrel by just a little bit.  For some reason, this really bothered me.  Looking back, I think it was pure aesthetics.

So I returned the AA model and got the shorty N-sized model.  Granted, it does look better, but it was probably a mistake overall.  Not only does the N-size have a shorter battery life, but none of my other gear uses these batteries.  And even worse, they're a little more expensive.

Note that EOTech has discontinued these, though you can still find them brand new at many retailers.  Unless you're just looking to save cash, I would just skip this model entirely and get one of the newer ones that among other things has the buttons on the left side instead of the rear for compatibility with magnifiers.  New models can also use CR123A batteries which many tactical lights also use.

Aesthetics aside, it's been a rock-solid sight.  I also like having EOTech's reticle-inside-the-ring setup.  I actually use the 65 MOA ring like mil-dots sometimes.  For example, because the reticle is zeroed for 50 yards, it turns out that the bottom of the ring equals point of impact at about 7 yards.  Therefore, at any range between 7 and 50 yards I know impact will be between the reticle and the bottom of the ring.

The only problem I've had with the scope appears to be a documented one, in which the sight will for some reason continue to draw power from the batteries even when fully off.  This means you may put in fresh batteries only to find them dead a month later without ever having even used the rifle.

Apparently, however, if you remove the batteries and wait 5 minutes before putting them back in, it forces the sight's firmware to fully reset and this is supposed to cure the problem.  I'm currently testing to see if this indeed solves it for me...


Make: GG&G
Model: Hood and lens covers (#GGG-1275)

Even though my rifle doesn't see too much time in the bush getting knocked around, I still do my best to keep the EOTech lenses safe and clean.  Until switching to the GG&G plastic covers, I'd been using a simple neoprene cover, but found that it fell off too easily and it's also just one more thing to stash and keep track of when you're shooting at the range.

Most of the online descriptions of these covers don't really explain exactly how they get installed, though.  I was under the impression that there was simply a front cover and rear cover, and that they attached to the main housing of the EOTech, similar to conventional covers that just attach directly to the body of the scope.

In reality, the two covers themselves actually attach to a rubber housing that you need to install underneath the plastic body of the EOTech sight itself.  So all you need to do is remove the EOTech plastic body (they provide you with wrenches) and fit the rubber housing to the inside.

The tricky part is getting the whole thing back into place as the combined housing now makes for an extremely tight fit as you try to slide it back into place over the sight itself.  The instructions warn you ahead of time that it may take some elbow grease and they recommend a dab of dishwashing liquid for lubrication.

I ended up using a lot more than a dab, though, and it was still an effort to get it back on.  Not only is it a very tight fit, but there weren't any convenient ways to get good leverage if you're only using hands and fingers.  But of course, once you finally get it on it means the entire thing is tight and rattle free.

I do like and recommend the covers.  The only thing that took some getting used to is that they don't really "snap" shut easily the way conventional covers do.  I think it's because you basically have the hard plastic of the cover meeting the softer rubbery body when they close.  It means you sometimes have to "work" the covers into the rubber housing until they're fully shut.

But they do pop open very quickly and cleanly, and it's usually more important to get them open than to get them closed.


Gun Gear: Rock River Arms Entry Tactical AR-15


Make: Rock River Arms (RRA)

Model: Entry Tactical

Caliber: 5.56mm/223 Remington

California Compliance: Fixed magazine via Bullet Button

Optic: EOTech 511.A65/1 holographic sight with GG&G lens covers (posting)

Iron sights: Rock River Arms rear sights with standard A2 front post sight

Handguard: Magpul MOE

Grip: Magpul MIAD with AA/AAA Battery Core

Stock: Magpul CTR

Sling: Gear Sector ASP single-point sling

Sling adapter: GG&G Agency sling adapter

Magazines: Magpul PMAGs (permanently configured for 10 rounds)

Ornamentation: Yellow happy face sticker